Telegram API for OSINT – Part 2 – Messages

Following on from Part 1 – Users, we will be looking into the messages posted into groups/channels/user conversations and how we can extract them.

Messages

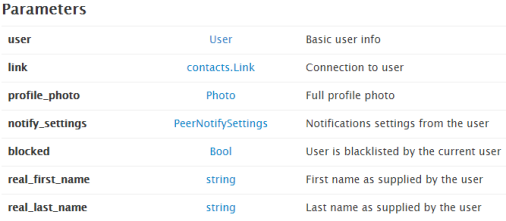
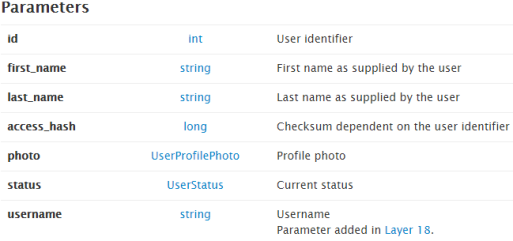
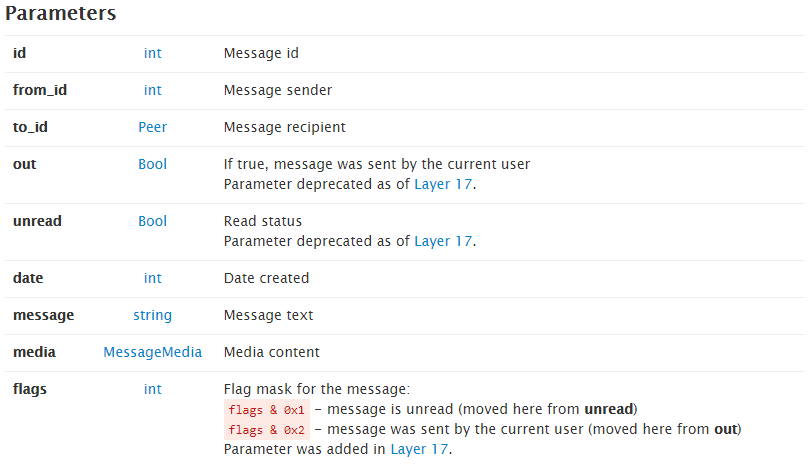
A message object in Telegram contains the following information:

message.PNG

If a message contains media, it will consist of one of the following:

Getting Messages

To query Telegram for messages, the messages.getHistory API call is needed. This requires the following:

history

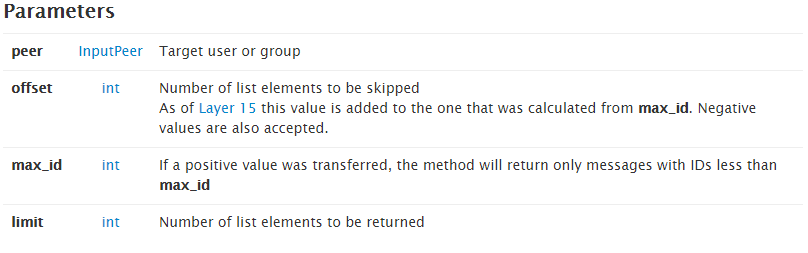
The InputPeer represents a channel/group/user and requires that you are a member of that channel/group or have started a conversation with the user. This is because the InputPeer requires the ID and the access_hash associated with the Peer, which can only be provided by Telegram. Since the web version of Telegram caches the IDs and access_hashes for the channels/conversations, the AppPeersManager.getInputPeerByID() function can be queried with the ID and will provide the corresponding InputPeer. The code below will enable you to query a channel/group/user for the history. Altering the offset and offset_id will enable you to collect the history all the way back to the channel’s creation.

var id = channel_id || user_id;
var offset = 0;
var offset_id = 0;
var injector = angular.element(document).injector();
var mtpApiManager = injector.get('MtpApiManager');
var appPeersManager = injector.get('AppPeersManager');
mtpApiManager.invokeApi('messages.getHistory', {
  peer: appPeersManager.getInputPeerByID(id),
  offset_id: offset_id,
  add_offset: offset,
  limit: 20
}).then(function(data) {
  console.log(data.messages);
  console.log(data.users);
  console.log(data.chats);
});

The returned data contains the last 20 messages along with the information associated with the users who posted the messages and any information about channels/groups the messages might have been forwarded from.

There is a lot of information available, too much to describe here. However if you are interested, there is now a script on the scripts page which will collect the history from a user/group/channel over the last 24 hours. Feel free to look at the code and play around with it. If you have any suggestions, don’t hesitate to contact me.

Telegram API for OSINT – Part 1 – Users

Those of you who have read my previous post or even tried out the getUsers script will already see that there is a large amount of data available within Telegram that isn’t easily accessible to the average user.

Over time I will be adding scripts to this page, hopefully enabling better data extraction for OSINT researchers or the nosey people out there! This is part one of a long series of technical blog posts on what data the API contains and how to extract data from Telegram, starting with part 1 on Users.

Users

A user object in Telegram contains a whole host of information, the userFull object contains the following information:

userFull.PNG

The user object returned can be one of the following:

  • userSelf – current authorized user
  • userContact – user from the contact list
  • userRequest – user not from the contact list, but with known phone number
  • userForeign – user not from the contact list
  • userDeleted – deleted user

Most commonly the User object will be userForeign and will contain the following parameters:

userForeign
UserForeign Object – User is not in contact list

Querying a User

To query the Telegram API for user details, one of the following is required:

  • The user must be a contact
  • The user has a public username
  • The user is in a common group and has been previously queried (see scripts)

Querying a User – Username

If a user has provided a public username, the user will appear in a search (this will be covered in a later post) or the user can be queried directly with their username:

var mtpApiManager = angular.element(document).injector().get('MtpApiManager');
mtpApiManager.invokeApi('contacts.resolveUsername', { 
  username: "publicUsername"
}).then(function (user) {
  console.log(user);
});

Querying a User – ID & Access Hash

To query Telegram for a user, the users.getFullUser API call requires one of three constructors:

  • inputUser = {_: ‘inputUserSelf’}
  • inputUser = {_: ‘inputUserContact’, user_id: id}
  • inputUser = {_: ‘inputUserForeign’, user_id: id, access_hash: user_access_hash}

These are mostly self explanatory, however for inputUserForeign, as the user is not a contact, the access hash is required. This is a checksum of the user_id and is returned by Telegram when the user has previously been queried (using a username or from the list of members in a group).

var mtpApiManager = angular.element(document).injector().get('MtpApiManager');
mtpApiManager.invokeApi('users.getFullUser', {
  id: inputUser
}).then(function (user) {
  console.log(user);
});

Downloading Photos

Photos in Telegram are stored in one of several data-centers and can be retrieved providing you know the volume_id, local_id and secret.  These values are returned in all of the user lookup methods described above.

The downloadSmallFile function is part of the MtpApiFileManager service and returns the data blob for that image. The blob can be turned into an image dataURI using the FileManager.getDataUrl function.

var mtpApiFileManager = angular.element(document).injector().get('MtpApiFileManager');
var fileManager = angular.element(document).injector().get('FileManager');
var inputFileLocation = {
  _: 'inputFileLocation',
  volume_id: photo_small.volume_id,
  local_id: photo_small.local_id,
  secret: photo_small.secret
}
mtpApiFileManager.downloadSmallFile(inputFileLocation).then(function (blob) {
  var dataURI = fileManager.getDataUrl(blob);
  console.log(dataURI);
  return dataURI;
});

Hijacking the Telegram API

The web version of Telegram is written in AngularJS and supports most of the features available in the mobile and desktop versions. This provides a useful platform to inject JavaScript and hijack the AngularJS app to interact with the API, without the need to maintain the code to handle the MTProto authentication.

Following on from the previous post here, injecting into the AngularJS app will allow us to interact with the Telegram API and also allow us to access data associated with page objects, usually inaccessible to a user.

The scripts page contains links to GreaseMonkey scripts for various useful Telegram scripts.

Examples

Getting the current dialog ID:

angular.element(document.body).injector().get('$rootScope').selectedPeerID;

Invoking the API to get members of a Telegram group:

var mtpApiManager = angular.element(document).injector().get('MtpApiManager');
mtpApiManager.invokeApi('channels.getParticipants', {
  channel: appChatsManager.getChannelInput(groupID),
  filter: {
    _: 'channelParticipantsRecent'
  },
  limit: 200,
  offset: 0
}).then(function (data) {
  console.log(data);
  return;
});

More examples will be given over the next few weeks

Accessing an Angular Service from the Console

AngularJS is an extensive JavaScript-based open-source front-end web application framework widely used across the internet. Web apps can be developed in a relatively short timescale, however it can often be difficult to access data and services hidden within the application.

Note: Most of these methods require that debugging information is available. See the bottom section for methods of doing this

Accessing the Scope

The scope/isolatedScope of a page or a specific node can be accessed via:

angular.element(node).scope();
angular.element(node).isolatedScope();

Accessing Services

A reference to an Angular Service can be accessed through the injector function associated with an element where ngApp was defined, or generically through any element with the ng-scope class:

angular.element(document).injector().get('serviceName');

Accessing Controllers

Directives sometimes define a controller, this can be accessed via:

angular.element(node).controller();

Debugging Information

If the methods above don’t work, it is likely that the site you are trying to access is in production mode and debug info has been turned off. This can be reversed using:

angular.reloadWithDebugInfo();

This will reload the page with debug info turned on. On inspection of the AngularJS source code, the same result can be achieved by setting the window.name value to:

window.name = 'NG_ENABLE_DEBUG_INFO!';

This must be set before the AngularJS app has loaded, as a check is made to the window.name value on load. Thus for a Firefox extension or a GreaseMonkey script, this must occur at document-start.